Sunday, 3 August 2014

Green Eyes


When I first started out wearing make up I made a little bit of a rookie error and went through a phase (I say phase, this probably lasted several years) of matching my eyeshadow to my outfit. Blue dress? Blue eyeshadow. Purple top? Purple eyeshadow. Yellow jumper? Yellow eyeshadow. So on and so forth. As I became more comfortable with make up this evolved from purely being one shadow smudges across the lid to multiple shadows blended out in elaborate smokey eyes - three different shades of turquoise, one across the lid, one in the crease, one under the eye. And, due to my OCD, if I was wearing an outfit with more than one colour then you can bet your bottom dollar I'd have all the colours of the outfit involved on my eyes somehow. I also wasn't a fan of blending the edges and liked a nice harsh racoon look in whatever colour matched the outfit going on. *Shudder*

Anyway, I one day realised this probably wasn't the best look and went really far in the other way, I began to only apply things that were taupe or brown to my eyes and it was probably the best part of a year before I even went as far as applying a black smokey eye again. What this means is that I'd built myself up quite the collection of coloured eyeshadows and when I ordered my blogger-requisite Muji storage last year I did the final purge and binned most of the ones that were still lingering. But not all.

I have always been told green shades have really suited me as my eyes have green in them which sometimes comes out to play (they can range from gold to amber to brown to green in the space of a few hours) and something made me hold on to a few of these green eyeshadows.

You can see my first attempt at picking these back up in last August's London video here. Now, in all fairness I don't think I had the camera at the best angle and I was filming with my back to the light so I think the video is making it all look a little bit worse than it actually is, but watching it back was enough to make me put the eyeshadows safely away again.

It wasn't until recently when I was looking at photos of Olivia Palermo's wedding that I noticed just how heavy Olivia's eye make up was in comparison to her usual (I like to spend a lot of my spare time looking at pictures of Ms Palermo, or Mrs Huebl!) - she has a really dark brown across her whole lid but the eye doesn't look OTT or dramatic.

It got me thinking - could I use this theory to apply a coloured eyeshadow without looking like a 4 year old had gone rampant with the colouring in pens across my face? I think the above result speaks for itself.

I actually really, really like it.

By restricting the colour just to the lids the colour itself becomes much less of a statement and less overpowering to the whole make up look, although this eyeshadow is bright green the overall look is a really pretty, everyday make up look that I'd be happy to wear to run into the library at uni or head to the shops in - no matter what colour I was wearing!

To achieve it I used an Estee Lauder duo which is no longer - washing the basic light shadow all over my eyes and over the inner corners, you just want any old Mac Brûlée-esque shade, just to create a base and to be honest you could probably skip the step altogether if you fancied. I then went in with the green from the duo, which is Ivy Envy and still available to buy as an individual shadow, and took that all over the lid on a Prestige eye shadow brush - which is again no longer available but any blending brush will do. (I'm really showing just how long I've been into make up for here, and just how long it takes me to use products up or admit that it's time to just bin them because they're clearly way past their use-by date!)

Using the same brush I then picked up some of the brighter green shade by Urban Decay, Krush, and blended some of that just in a line in the centre of my eye lid so it would catch the light when I closed my eyes without making it into a dramatic 12 tones smokey eye. I then lined with a really thin line of Stila's Smudge Stick Eyeliner in the shade Moray (the green one!) just to add a tiny bit of definition. I didn't want to stray into making anything about the look besides the colour itself dramatic though, so it was a very very thin line. My top tip for a thin line of eyeliner is to draw it almost along your eyelashes rather than your eyelid - if you press more of the weight of the product on your lashes it means you get the thinest line on the lid and once you apply mascara any colour that might be on your lashes disappears. in terms of mascara I opted for the Clinique High Impact Extreme Volume Mascara which is starting to dry up and will need replaced soon but is still performing to the last - very impressed with it! As for my eyebrows, I filled them in with the Rimmel Eye Pencil in 002 Hazel and brush through with a MAC 204.

I had powdered with my Make Up Forever HD Powder (nice powder to have if you're into filming things but totally not necessary if you're not doing stuff on camera as it doesn't work well with flash photography so you'd only really get the benefits of it in day-time photos, depends how flawless you want those holiday snaps to be!) before applying the make up so was able to brush most of the fall down off anyway, but my top concealer for topping up after powder is the Estee Lauder Disappearing Smoothing Creme Concealer. It's not my HG concealer but it is the best for blending in and topping up without every going cakey and it works really well for topping up on a night out after you've applied powder as it blends in so seamlessly.

So there you have it - how I applied a coloured eyeshadow and came out of it unscathed! Going to experiment with different colours and see how it comes out - I will master you blue eyeshadow, I will!


Tuesday, 29 July 2014

What's On My Face...


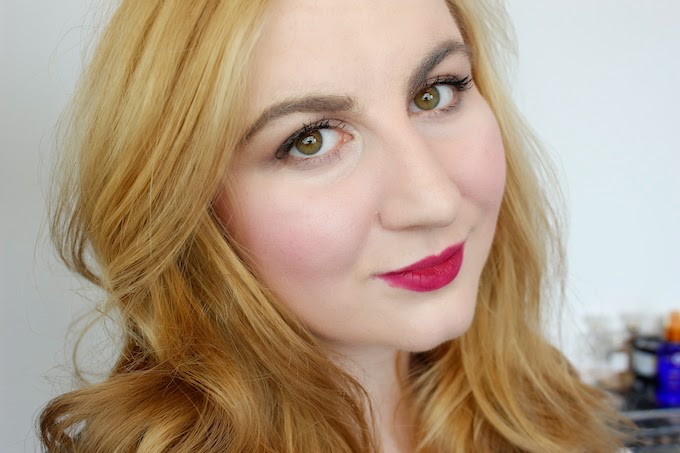
The make up in this post was all contrived around the lipstick - it's Topshop's Beguiled and I've had it for a while but, as with most wine and deep red shades, had put it away when the warmer months came along and had forgotten about it. I pulled it out by chance the other day and decided on the spot that I was wearing it that day and no one was going to stop me - whether it's still July or not.

With a statement deep lip you need a flawless complexion - this one just doesn't lend itself to tinted moisturiser unless you're Cindy Crawford I'm afraid (though if you are, by all means just stick with what you're doing) so I used my L'Oreal True Match in the shade C1 to get a base that was natural looking but had enough coverage to even me out and make my skin look a whole lot more airbrushed. I layered that over a base of Benefit's POREfessional, which I'm currently trying to use up. I do like it, and had repurchased it many times, but then the Clarins Instant Smooth came along and kicked POREfessional's ass. I'm afraid once this tube is done it's Clarins forevermore for me. Concealer wise it was MAC Studio Fix in NW15, one of my ultimate favourite concealers and not one I'm ever without in my stash.

For cheeks I used MAC Frankly Scarlett blush, which is just one of the prettiest blushers I've ever owned - it looks pretty terrifying in the pan but when applied lightly it gives the most gorgeous rosy flush, and it looks really natural too thanks to the red base - it's much more representative of how I look when I actually blush and (although it is July) it's my favourite winter blush as it always gives me that healthy 'just played a rousing game of hockey outside' look. For a highlight I opted for the highlighter half of Benefit's 10 (which they've discontinued. Boohoo!)

Eyes wise I used Harvest Moon, Cuddle, Cinnamon and a tiny bit of Frolic from the Cargo Vintage Escape Palette. Don't want to say too much here as I'll have a full post coming soon, but let's just say this is pure palette love. My Stila Smudge Stick in Lionfish provided a tiny bit of definition for my eyes and I then reached for the Bourjois Volume Max mascara. Eyebrows it was MAC's Lingering eyebrow pencil (my favourite colour I've eve found for my eyebrows) and I was done!

Saturday, 26 July 2014

NudeStix Lip & Cheek Pencil Review


I received this as a gift with purchase from Space NK (as a regular customer gift with purchase, not a blogger gift, which is why there's no * next to it, you'll always be given full disclaimer for anything featured that was sent to me via a PR for the purposes of blogging, this one was just a regular free gift) and wasn't that interested at first. I had noticed the brand when it first popped up but wasn't all too fussed, I'm not the type of girl whom the whole concept of 'nude' appeals to - I'll always reach for full coverage foundations over light tinted moisturisers and I will always own double the amount of red lipsticks than I do of all other colours combined, #sorrynotsorry - but I gave it a go a few weeks ago and have been forced to admit that first impressions might not make the whole story.

The colour, although it looks quite baby pink in the pencil itself (the shade is called Love btw, which I really like as a name) actually comes out as a nice pinky/peach hybrid - definitely more pink than peach but not insipid and it actually works nicely on my pale skin as opposed to draining me altogether, which is what I thought would happen from the look of it in the pencil. The colour is actually turning out to be my number one factor in why I love this - since it isn't the type of colour I'm usually drawn to it it fills a gap on my collection quite nicely as as a cheek colour it's the perfect compliment to every day make up or playing the background runner to a stronger look that doesn't need a strong cheek to be added into the mix.

Anyway, enough about the colour  - let's talk formula. It actually blends beautifully into the cheeks, it goes on and feels almost wet at first while you blend it in (I used my fingers) but it does dry down and settle - but with plenty of time for you to work the colour to where you want it. The longevity is surprisingly good, it's not on par with something like Tarte but for a such a liquid-y formula it lasts a good 6 hours before it might be time to reapply, and for all the room the pencil takes up in your bag it's hardly a chore to take it with you, especially when you don't need a brush and can use it as your lip product for the day too. 

On the lips it also lasts a reasonably amount of time, it lasted through two glasses of diet coke for a start and was still on the lips when i came back from a 2 hour shopping trip. Again, it's not a matte formula so it isn't a case of apply it in the morning and it'll still be there in 12 hours time, but it's comfortable on the lips and as it fades it does so really evenly, meaning you're not left with a strange half on/half off look. It feels similar to Nuxe Rev de Miel lip balm when applied, is faff free and doesn't need a liner.

I pulled this one out of my bag in my What's In My Handbag video, so you'll possibly know the last thing I want to talk about already if you've watched that but, in case you didn't, I just have to mention the packaging. The little tin with the massive mirror taking up the whole lid is ideal for throwing in your handbag (and there's room for a concealer in there too, meaning for me that I can skip the make up bag entirely) and it also comes with a sharpener, which you can actually use as a lid - it's the lid on one end and the sharpener on the other, meaning you're less likely to lose it. I am a massive fan of this as I hate products that you then need to go purchase something else to use, especially since I constantly lose make up sharpeners and always get side tracked by more sparkly products (like red lipsticks) when I go into a shop with the intent of buying one. 

Lastly, let's talk price. It's £24 which I think may be slightly more than I'd want to pay for it - I thought it would have come in to the £18-£22 category as I hadn't actually looked up the price of it before beginning to type up this review, but I do love it. I think it'll last for ages as I've been using it a fair old amount lately and haven't have to sharpen it yet and it does come with such nice packaging too. For me it's a beautiful, blend able product and the colour has really filled a gap in my collection so I can honestly say I will repurchase it when it's done, but unless you're after one of the individual shades I don't know if it's an exciting product I would rush out to buy. But then, I've got so many exciting products that I rush out and buy that a peachy/pink pencil filled a basic gap in my collection, so if you're in my boat then maybe it is something to rush out for!

Wednesday, 23 July 2014

Vichy Dermablend Foundation


I think we're off to a good start here in understanding each other - my first blog post was about eye cream and this one is about a high coverage foundation. They're both staples in my collection so I think it's a good base to gather what my beauty preferences are - good skincare and flawless finishes. 

In terms of flawless finishes, the Vichy Dermablend foundation delivers. With a coverage that seems to be enough to cover imperfections but light enough to let my freckles show through (you can see them on my forehead) this foundation is a real winner. I've been a huge fan of the Estee Lauder DoubleWear for many, many years now but I know for a lot of people they find it thick and difficult to work with as well as just being a little too much coverage - it pretty much blanks out everything on your face. Whilst I find that applying DoubleWear with a good buffing brush leaves a beautiful finish I do have days where I don't want such high coverage or thick foundation on my face - but without looking like I've slapped on tinted moisturiser - and that's where this one fits in. 

With the whole concept of Dermablend being about coverage I was expecting a really thick consistency, which this one doesn't have. Not to the extent of other high coverage foundations anyway, though it admittedly is thicker than the likes of L'Oreal True Match/Luminous Silk. Brush wise I've been swapping between the Real Techniques Buffing and Expert Face brushes and finding that both leave a really lovely finish. It doesn't feel heavy or thick on the face and I quite forget I'm wearing it, so points for how comfortable it is. 

Coverage is buildable so brilliant if you want something more natural on most of your face but want to build up to cover any areas of pigmentation or redness, I found it was more than able to cover the small scars I have on my cheeks from where I had spots when I was younger but I did still reach for a concealer for under the eyes. 

Wear time on this one is pretty good too, I found it lasted all day and - bonus - didn't need to paired with a smoothing primer such as the Clarin's Instant Smooth or the Benefit POREfessional to stop it from sinking in to pores the way DoubleWear does.

Packaging - well, it's pretty boring and nothing special but it's what's inside that counts, right? Just not exactly a bottle you'd want to display on your dressing table. Plus points are that it's not a hard bottle which makes it great for travelling and it houses 30ml of product, which is actually the exact same as DoubleWear  though the squeeze tube makes it seem like a much smaller product.

For the price point this is a brilliant alternative to a high end high coverage foundation such as DoubleWear (£28.50 for 30ml) or Laura Mercier Silk Creme (£34.00 for 35ml) that doesn't let it down on wear time or finish, though for me DoubleWear does last longer and cover more, so they're both something I want to have in my collection.

Swatches L - R

Laura Mercier Silk Creme in Soft Ivory - Estee Lauder DoubleWear in Shell  
Vichy Dermablend in 15 Opal - MAC Studio Sculpt Foundation in NC15
 L'Oreal True Match in N1 Ivory - L'Oreal True Match in C1 Rose Ivory

The only thing that let me down about this product, and part of the reason I was sure I wanted to review it, was that I couldn't actually test the colour before buying. I have, since buying it, seen some of the larger Boots stores become equipped with tester racks but they don't seem to be maintained very well and it seems as though this range is pretty much forgotten about, perhaps because it's located in the skincare aisle with the other Vichy products rather than with the make up. 

The shade I purchased - 15 Opal - is the lightest and I had to blind buy, hoping it would be light enough for me - I know all my fellow pale girls out there will feel my pain at this by how often the lightest shade in a foundation range is still not light enough (get on it please brands!)! As you can see from these swatches it is by far the darkest of my foundations and for me it means that I need to be light handed and use this with a good buffing brush. It also means that if I build up the coverage in certain areas then it becomes too dark. I'm lucky that what I want to cover is mainly the scarring on my cheeks and then I'll be placing blusher over the area so I can build it up without being too obvious but I think if I was trying to build this up elsewhere on my face the colour would be noticeably too dark. Having said all this though I'm a girl who can find MAC NC15 a bit too dark sometimes so I am super pale and the shade range is probably suitable for most skin tones, though the lack of testers is a problem. At £16.00, although this is a much more pocket friendly alternative to a high end foundation, it's still more expensive than the high street offerings that are about the £10 - meaning this is 160% of the price, you want to be able to test it and check the colour is right for you. 

If you can find a tester then I really do highly recommend this foundation if you're after something with a flawless finish, good coverage and good wear time. 


Sunday, 20 July 2014

The Round Up... In Shower Body Moisturisers

We live in a fast paced age, time is of the essence and the rise of smart phones and 4G mean we like convenience. (Please tell me I'm not the only one who has a breakdown if I can't get signal and therefore access the latest youtube video in my subscription box on the subway!) It's little wonder then that companies have cottoned on to this in the beauty sense and are delivering us multiple ways to moisturise our bodies before we've even left the shower. This has even more benefits if you live in the UK like me and during the winter the time spent between exiting the shower and putting clothes (which you've placed on the radiator before hand of course!) on must be minimised as much as possible, even if it means forgoing moisturiser and being a Scaly Sally for a few months. Well, scales be going (though of course there's no excuse now we're getting into July!) because there are some brilliant products out there...


Best For... Not That Much?!
Nivea In Shower Body Moisturiser - £5.10
The first offering in my collection of in shower moisturising products is this one from Nivea, this one that created such a stir in the blogging world about a year (or maybe more) ago and that I dutifully trooped off to buy when I saw some of my blogging favourites sing its praises. Well, I'm really not that impressed. I don't know if I'm majorly missing something but this doesn't really do much for my skin, at least not much that's off any use in the long term. The ingredients list boasts that infamous mineral oil which stops it from penetrating the skin and that's presumably why I haven't seen anything that great come of it. It gives the body a sheen once it's first used, but it's a short term effect and there are no long term benefits so this shall be the first post which the tag 'Don't Buy This' is added to. Sure, the sheen is nice, but achievable with both of the other products listed and it means you're not washing £5.10 literally down the drain with no real benefits for your skin!


Best For... Long Term Results
Lush Africa Paradise Body Conditioner - £20.00* (Not online yet, sorry!)
In stark contrast this one does a very good job of delivering long term benefits. The high price is cancelled out by how little of this you need, so it will last pretty much forever. You use this one after you've washed yourself, stand out from under the water, rub it all over (or anywhere you want to moisturise) then rinse it off. The smell is pretty questionable on this one but it doesn't linger after you've used it. What does linger is that heavy, moist feeling - even after you've rinsed, hopped out of the shower and dried yourself you can still feel this on your skin, working its way in and penetrating all those layers. Although the smell is a but funky if you can get by it this product is definitely worth a space in your shower.


Best For... Quickness
L'Occitane Almond Shower Oil - £17.50
I've been a fan of this one for years now and have repurchased many a bottle, more so than I'd care to face up to. You can buy a 500ml refill of this for £23.50 which means that after you've bought and finished a bottle you can buy the refill, which will fill it twice over and save you some pennies, which makes the price of tho sone a little more bearable. Unlike the Lush offering a little of this doesn't go a huge way - though perhaps that's not helped by the fact I love the smell and slather myself in it like I've got a version of Willie Wonka's chocolate waterfall and river that consists entirely of this oil stashed in a beauty version of his Inventing Room somewhere in my house. Which I don't. Though I can dream. This goes on like an oil but turns to a milk once it's mixed with water - a body version of the Clarins Melt Off cleanser - but the oil penetrates deeply and moisturises my skin both instantly and in the long term. I get the same healthy look that the Nivea provides but with the long term benefits too. I love the fact that this one comes in a bottle that means I can squeeze it onto my skin without worrying about water splashing in and ruining the product a la the Lush tub so it means I can use it with little care and probably too much reckless abandonment for a £17.50 shower gel. But then, it's not just a shower gel - it's a moisturiser too. See how I justify it?

In case you can't tell the L'Occitane offering is definitely my favourite, but it does feel weightless and leaves no residue so for when you want that pampered, moisturised feeling the Lush one does the job nicely, though both deliver moisture that packs a punch and penetrates into the skin properly. As for the Nivea? Save the pennies and spend a little bit more on a product that actually works. Or go about it the old fashioned way and spend the time using a separate body moisturiser - it is July after all, and the slight increase in heat means that it's maybe not totally terrible to be unclothes for a little longer between leaving the shower and getting dressed!


Monday, 14 July 2014

Stila Acai Crush Lip & Cheek Stain


It is a truth most commonly acknowledged that dual purpose products must be in want of something in one or other department. That is to say, in a less Pride and Prejudice inspired way of speaking, that they're usually designed for two things and pretty much only good at one thing.

This Stila product leans probably slightly more favourably to the cheeks but I actually do like it on both. 

On the lips the stain is dry and sinks into lines, as you can see in these pictures. Having said that a good lip balm underneath to smooth out lines and dryness does take care of that. It can be applied straight from the tube onto the lips with the brush applicator provided, though be careful - this stain is a Stain (note the capital S!) and that little blotch that goes slightly out of the lip line was something I was stuck with until scrubbing it off on my return home that night - following dinner out and multiple cocktails.

Now, onto the cheeks. I love this on the cheeks  - it's gel based and doesn't seem as dry on the cheeks as it does on the lips. For application though, you need to be incredibly careful. First thing's first - don't apply this straight from the applicator onto the cheeks and don't deal with this product if you're in a rush because the pigmentation is crazy. The tiniest amount goes a long, long way and heavy handedness runs the risk of clown style make up. 

When you're first getting used to the product I recommend mixing it with a dot of foundation so you can temper the pigmentation until you get the hang of it. I use the Real Techniques Expert Face Brush to do this. You have to work incredibly quickly with this product as, similarly to the lips, once it sets, it sets. A lot of people recommend a stippling brush with these types of products. Using a stippling brush made me look like I had chicken pox.


As you can see in this photo I have applied the product to my hand and blended, but the place where I originally touched the brush to the skin can easily be outlined and although I blended straight away the edges aren't for feathering off. When I applied the product with the stippling brush all the little areas where the product first touched settled into tiny dots and made me look like I had a real issue going on. You can also get an idea from this photo of just how bright this product can be when applied heavily.

The simplest thing for me is to twist up some of the product, swipe it over the back of your hand and then pick it up from the back of your hand with your chosen dense brush and buffing it quickly like foundation in circular motions. 

It is worth mentioning that these Stila Lip & Cheek Stains are scented - I have the coconut one and it's divine when swatched and sniffed - but the scent doesn't really translate once it's applied to the face and mixed with other produces. I haven't found that the scent has irritated my skin at all but in the interest of full disclosure it's still something worth pointing out!


Friday, 11 July 2014

The Simple Life


So in a world of beauty blogging, where a smokey eye can use up to 10 various shades of grey and black eyeshadows (plus your inner corner highlight, obvs) and I can get overexcited and want to pile every product from my latest boots spree on my face in one go, it can sometimes be easy to forget the simple make up looks.

This is something I'd call French Sexy - it's understated, chic and laid back - and, above all, incredibly simple.

The base was really easy - Benefit's POREfessional (which I totally forgot to include in the bloomin' photo - #fail!) around my nose and cheeks to try an drake those pores seem invisible, for however fleeting a time they may be, plus L'Oreal True Match foundation in C1 Rose Ivory - a really thin layer applied with the Real Techniques buffing brush.

An issue I find, as a pale girl, with drugstore foundations is that the cooler, pink tone based ones can often emphasise the pink tones already present in my skin if I try to build them up or create more coverage but the neutral or warm toned ones, even in the palest shades, can seem slightly too dark. I do like the L'Oreal True Match in the shade N1 Ivory but I do find I need to spend some time properly buffing it in to avoid the mask look at the edges. As far as drugstore foundations go though, they're probably some of the best I've found for the pale kids and the finish and wear time are great too. I used my Nars Radiant Creamy Concealer in Chantilly around my eyes and then dusted everything in with my Soap & Glory Powder, using the Real Techniques Powder Brush.

Cheeks wise it's MAC Tenderling, which is the perfect shade to define the cheeks and add some life without depositing too much colour. I layered that over the highlighter side of Benefit's 10, which isn't available anymore but was basically a powder form of High Beam. For me, layering highlighter first then putting blush over the top means I never go OTT with the highlight or get the really glittery look. Both applied with a MAC 168.

On the eyes I went all over with Estee Lauder Hot Cinnamon, applied with a MAC 217 and taken just over the lid itself, not blended up or out and then lined with the Stila Smudge Stick Eyeliner in the shade Lionfish (the brown one!) on the top and outer bottom of the eyes - smudging a tiny bit with the MAC 239, though you could just use your fingers. Mascara wise it was Clinique High Impact Extreme Volume and my eyebrows were lightly filled in with the Rimmel Eyebrow Pencil in the shade 002 Hazel. (As you can see my eczema is playing up and my eyebrow lady can't thread them when it is so they're quite grown in and didn't need too much filling in as a result!)

As for the lips? Nuxe Reve de Miel lip balm finished it off looking natural and leaving lips perfectly soft.

Oh! And just before I go... I am spending tonight washing all the make up brushes I own, so don't get freaked out and think I'm leaving them like that!